- This topic has 50 replies, 14 voices, and was last updated 8 months, 1 week ago by
pilatomic.
- AuthorPosts
- 4 December 2023 at 08:29 #50240
Only noticed when measuring a PCM5122 on the audio analyzer (pretty much the same chip on the analog output).
Would you happen to recall the output load characteristic during that test ? Having a relatively low (~1k) load impedance could definitely degrade that THD.
You mean 100 uF, right?
No, really 10µF. That’s what the LM1117 is characterized with (the 3.3V fixed version, not the ADJ one). It requires the output cap ESR to be > 0.3R, which already excludes ceramic caps.
4 December 2023 at 09:37 #50241Would you happen to recall the output load characteristic during that test ? Having a relatively low (~1k) load impedance could definitely degrade that THD.
I’m usually measuring at 10k. It is a known “problem” with those DACs. Same goes for the output volume. It only shows optimal THD+N at around -1.5 dB. Any higher and it will degenerate (saturate the output stage?).
No, really 10µF. That’s what the LM1117 is characterized with (the 3.3V fixed version, not the ADJ one). It requires the output cap ESR to be > 0.3R, which already excludes ceramic caps.
Ah, I see. Was only quickly looking at the reference schematic where 100 uF is used. Been quite a while since I was using such higher power LDO. Mostly switching buck converters nowadays and only small / modern LDOs with high PSRR for noise optimised low-power stuff.
4 December 2023 at 09:53 #50236Hello Beoworlders,
Weeks went by, and this project is now reaching completion. I have received the new PCBs, and got myself access to a small CNC machine to mill the back of the enclosure, so that I’m not ashamed anymore of showing that side of the device. I have also made properly sized labels (the previous ones were too small), and designed and printed a cable holder, that ensures any mechanical strain on the cable is transferred directly to the enclosure rather than ripping the wires off the PCB.
This version does support a USB firmware upgrade process, so that both the MCU and the BT module firmware can be upgraded later.
I also came up with a pricing scheme. My intent is to offer those mainly as kits, only requiring some beginners soldering skills to assemble it. A kit would include :
- A PCB fully programmed, missing the red LED.
- The red LED. (As it is easier to have it flush with the enclosure when soldering it after mounting the PCB).
- Around 80cm of 4 conductor cable.
- The DIN-7 connector.
- The enclosure with properly machined holes, and all screws.
- The cable holder part, with 2 zip-ties.
- The adhesive label.
- The pricing would be 80€ (ship. Excl) for a kit, and 115€ for a fully assembled device.
I still need to spend a bit of time tweaking some features, notably I am looking at a way to change the device Bluetooth name, so that you can have it match the system it is connected to.
Lastly, I have everything needed to build a few kits, except I need to order new enclosures, as I ruined the few I already bought honing my CNC machining skills (no wonder machinist is a real job, who would have thought !), and only the last one ended up living to my expectations.
Based of those 2 points, I expect to be able to provide the first kits in a few weeks. Please contact me in PM if you are interested.
While I work on those last details, here are a few up-to-date picture :
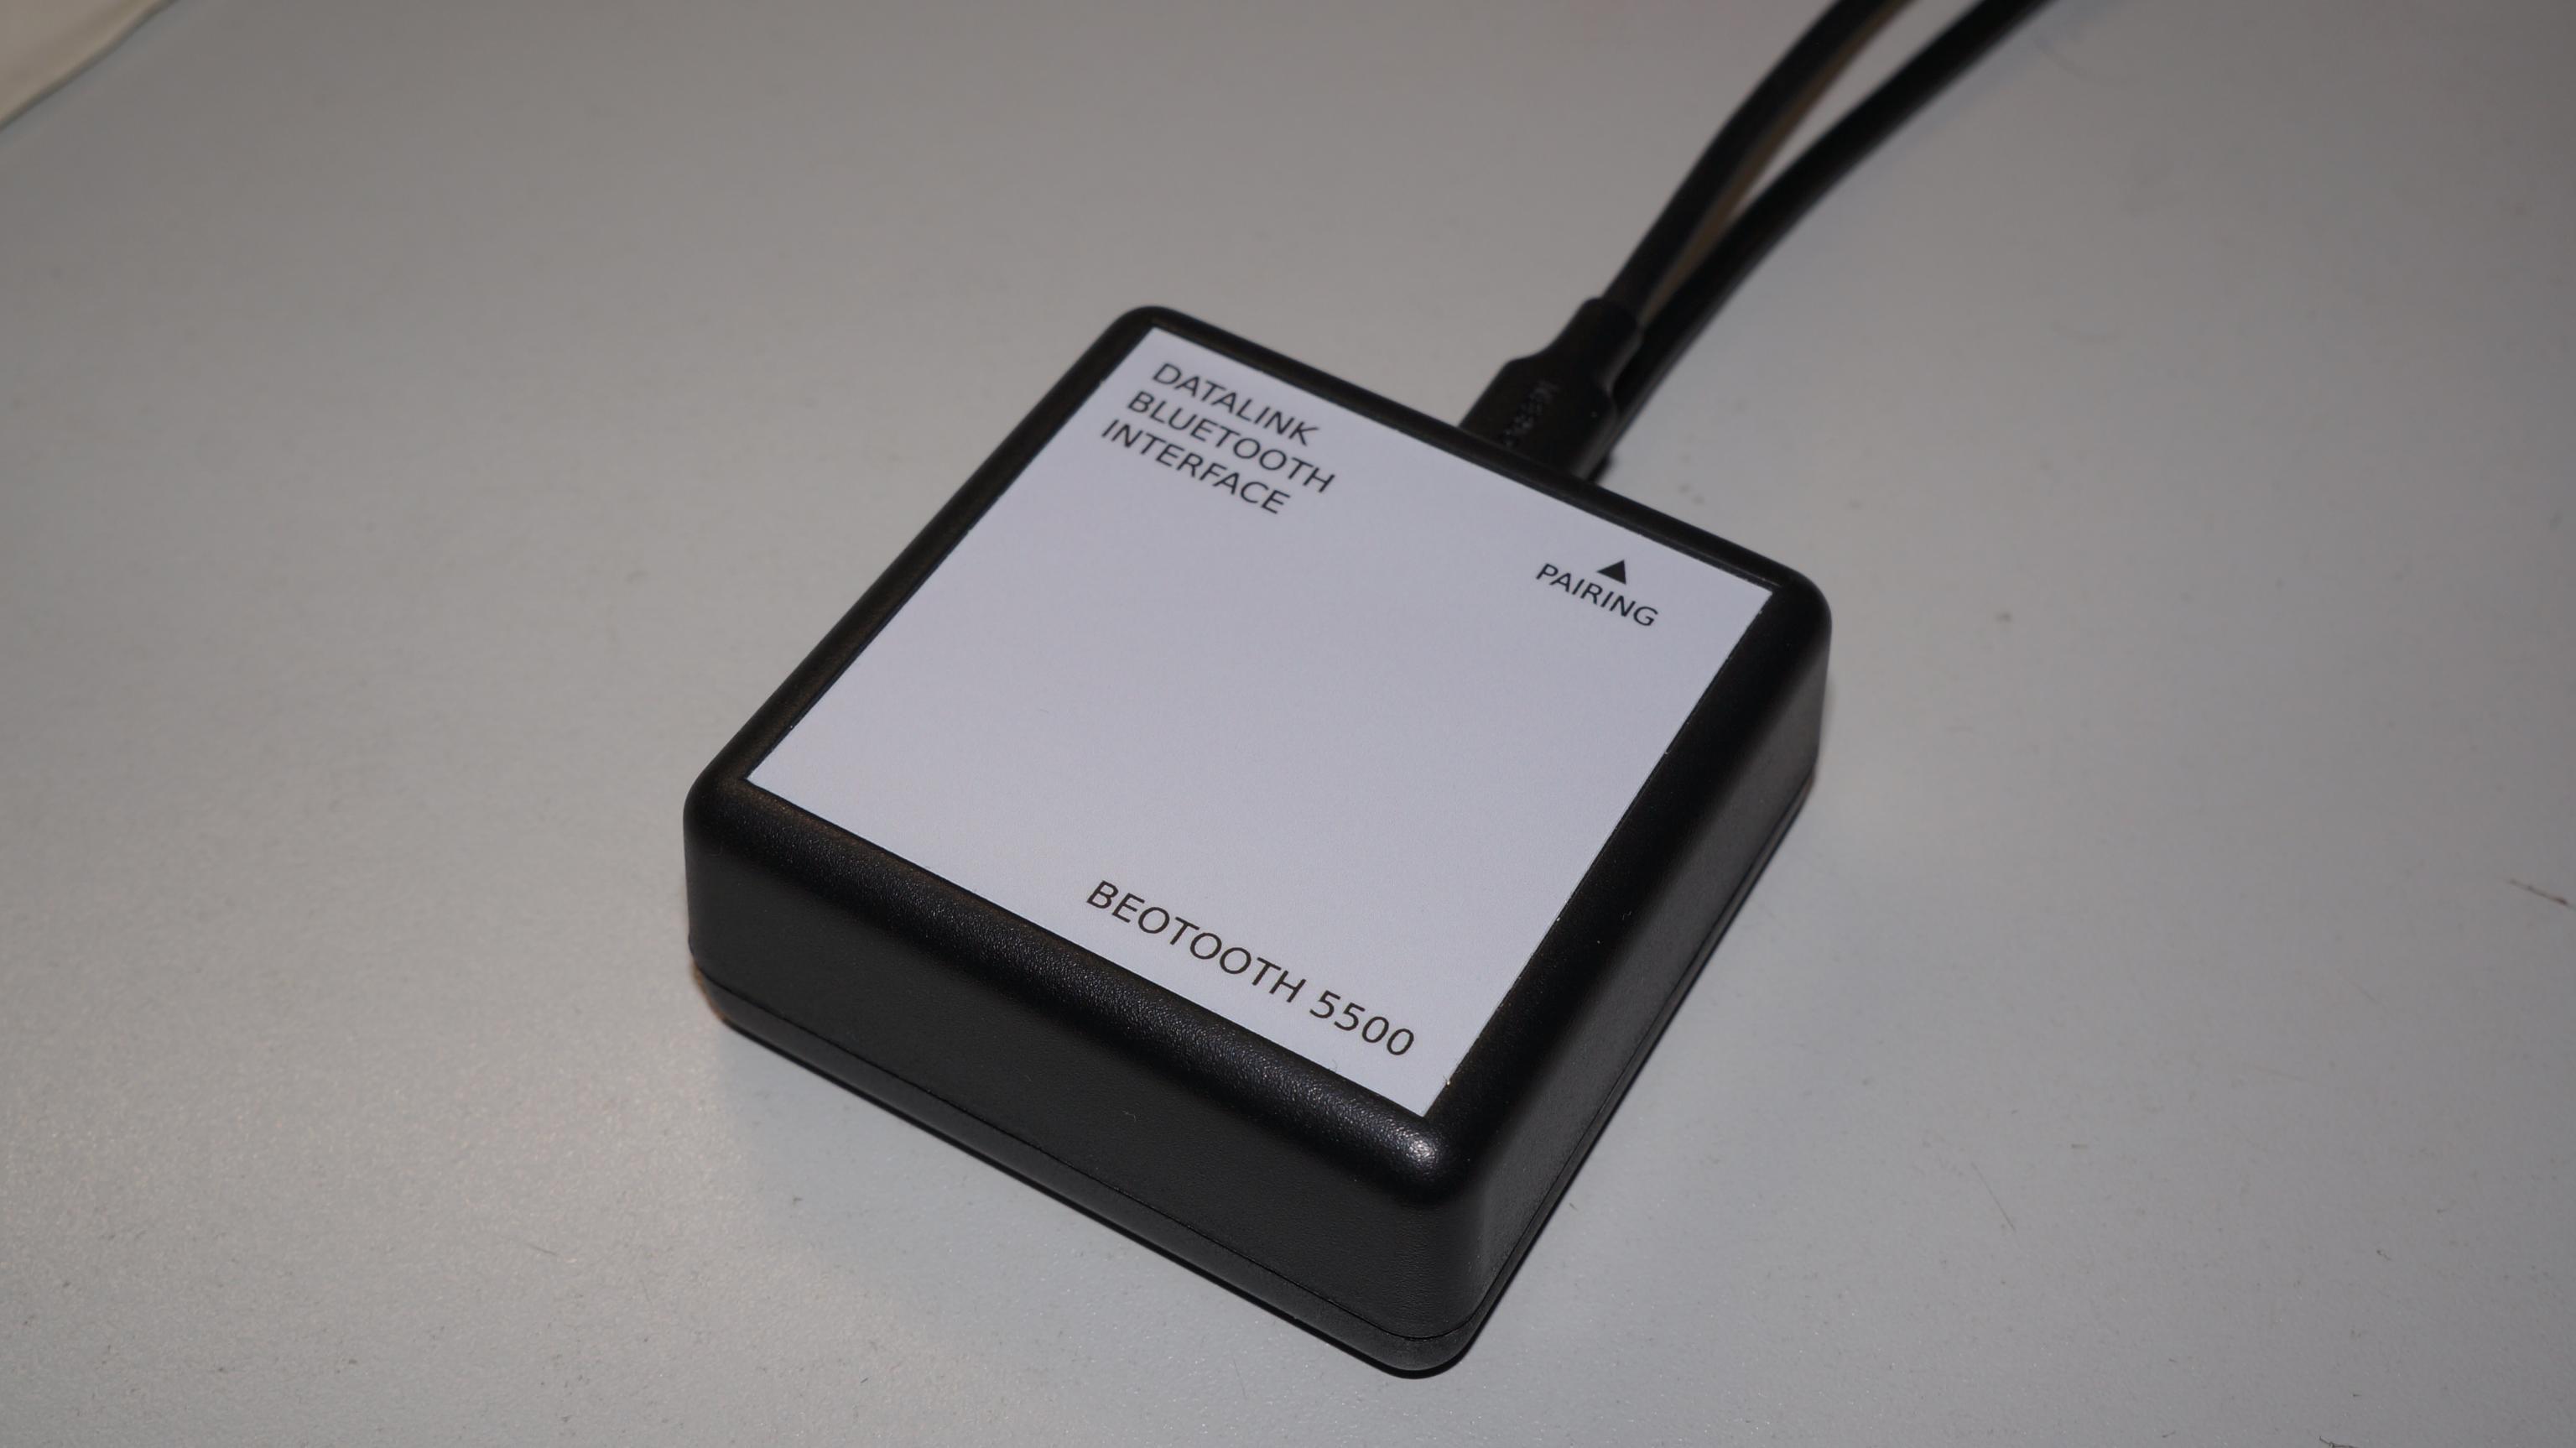
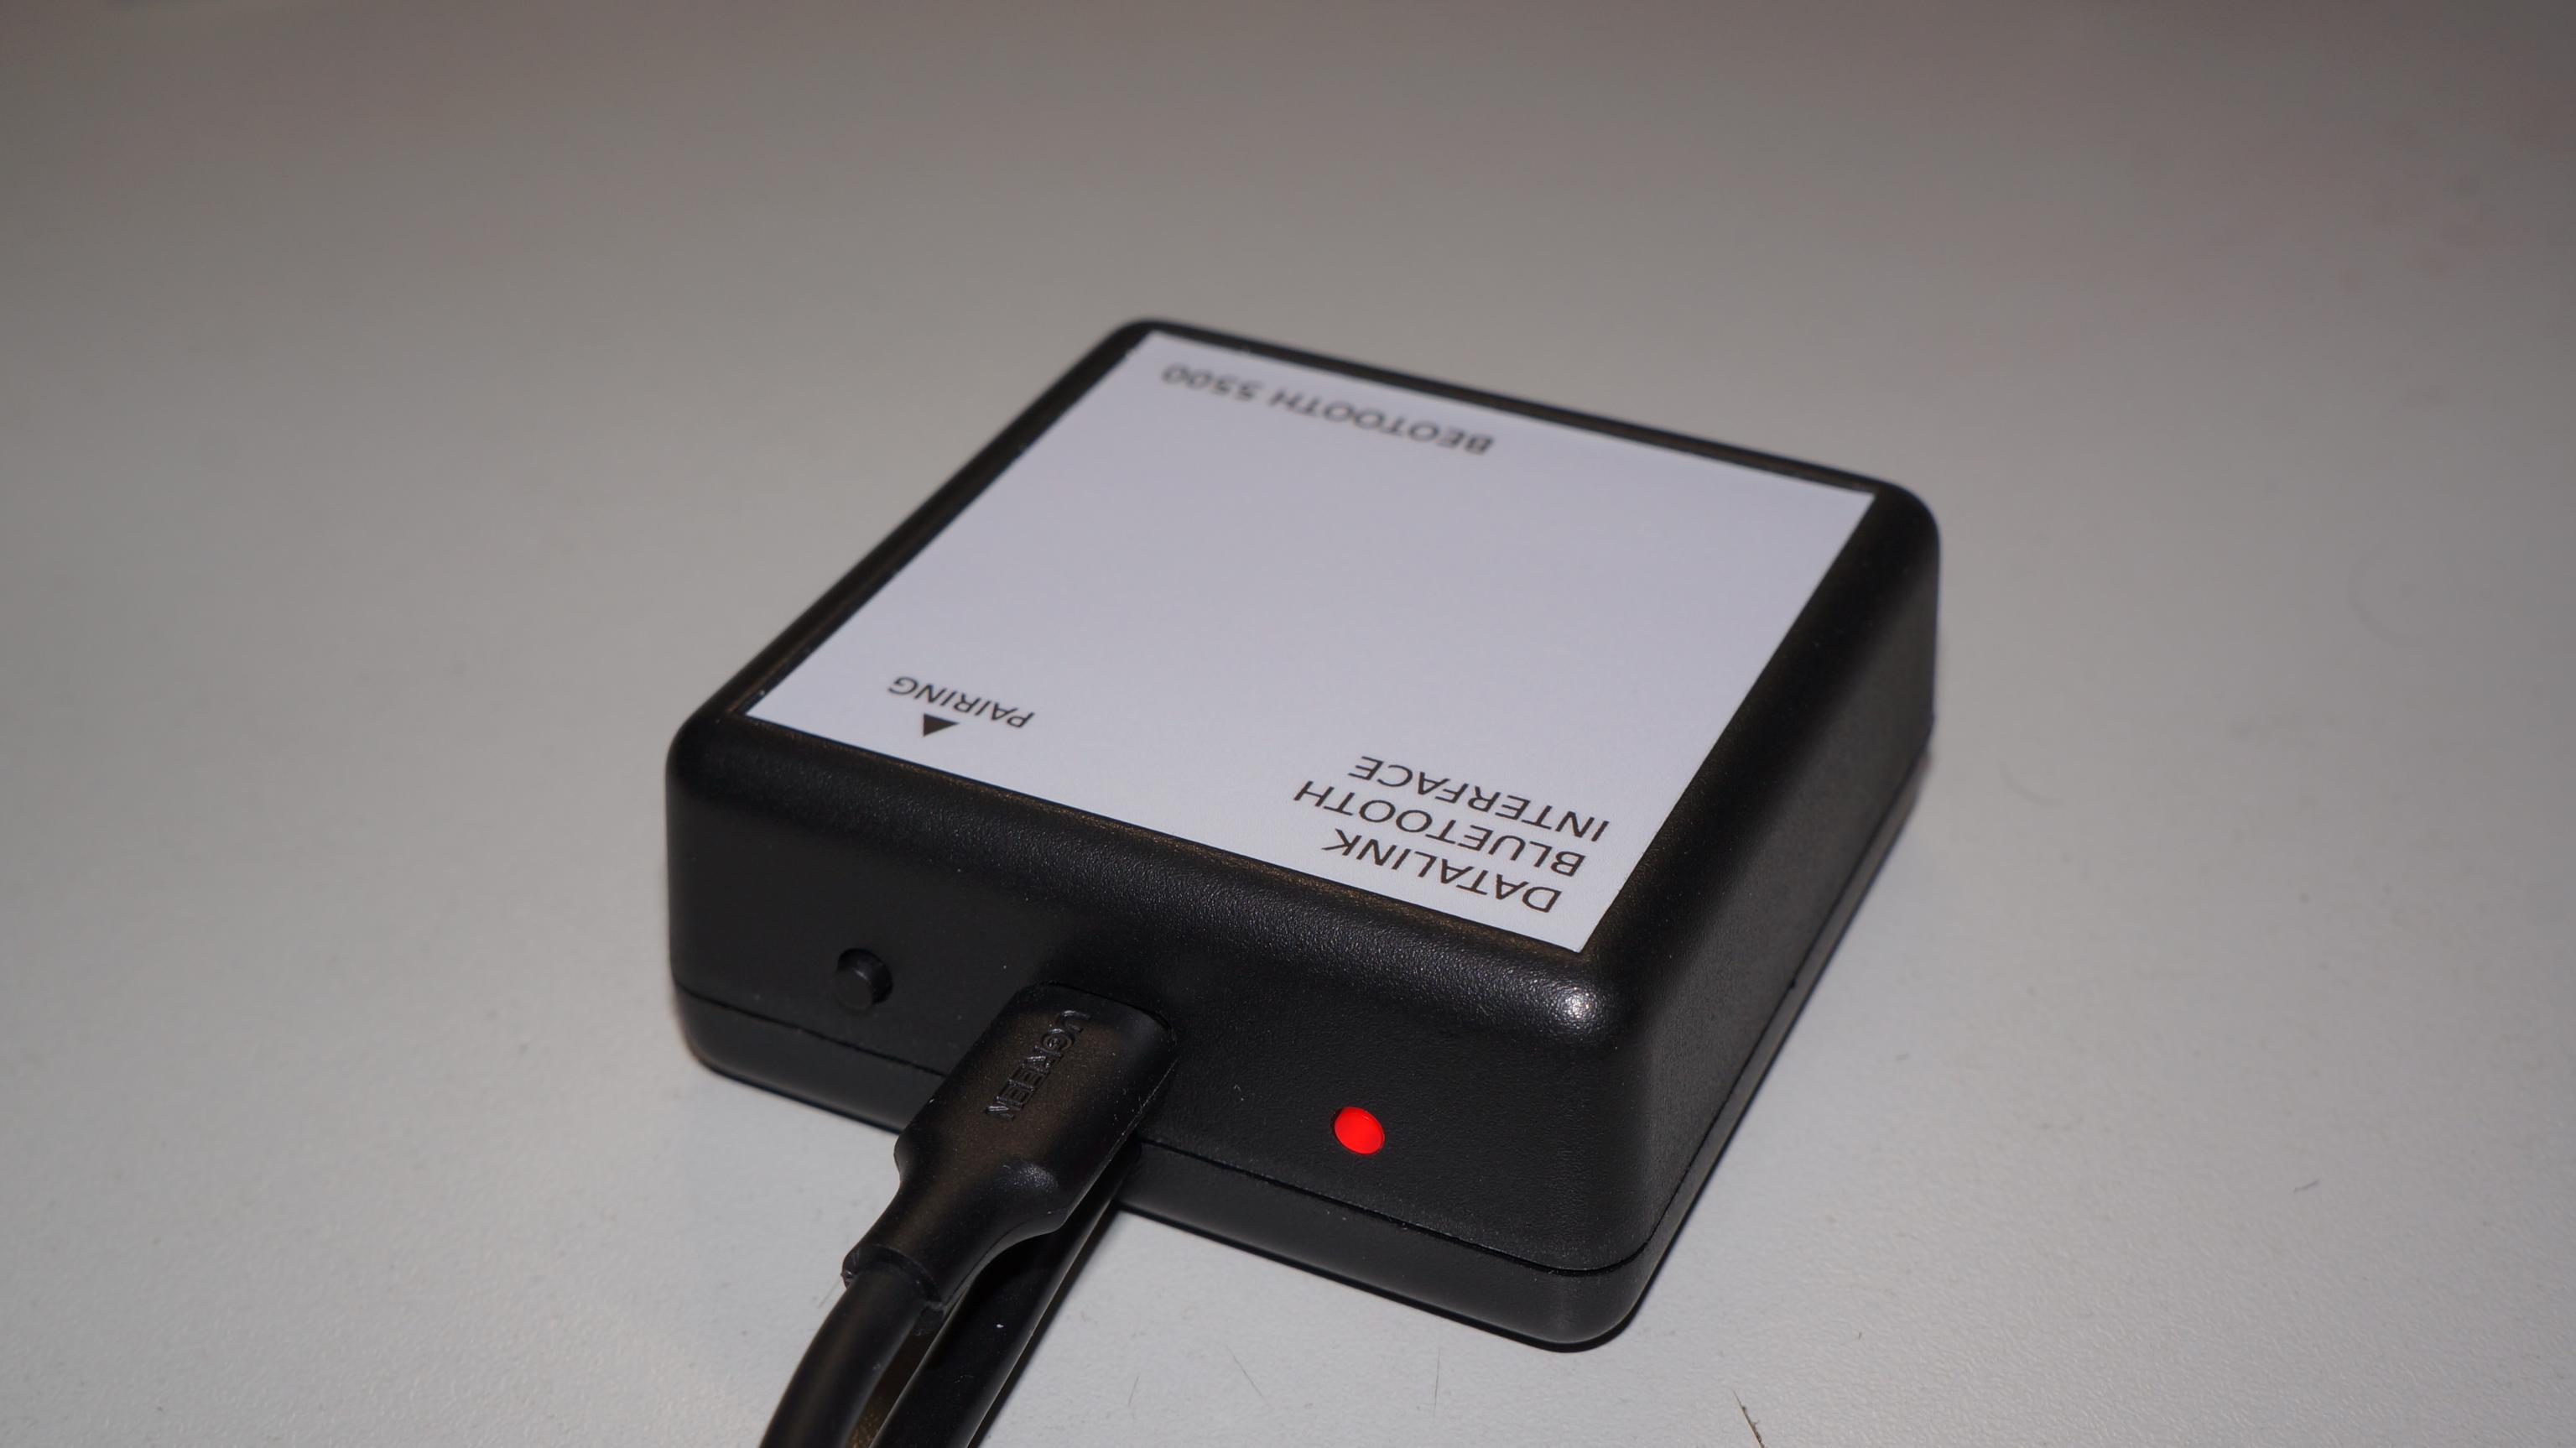
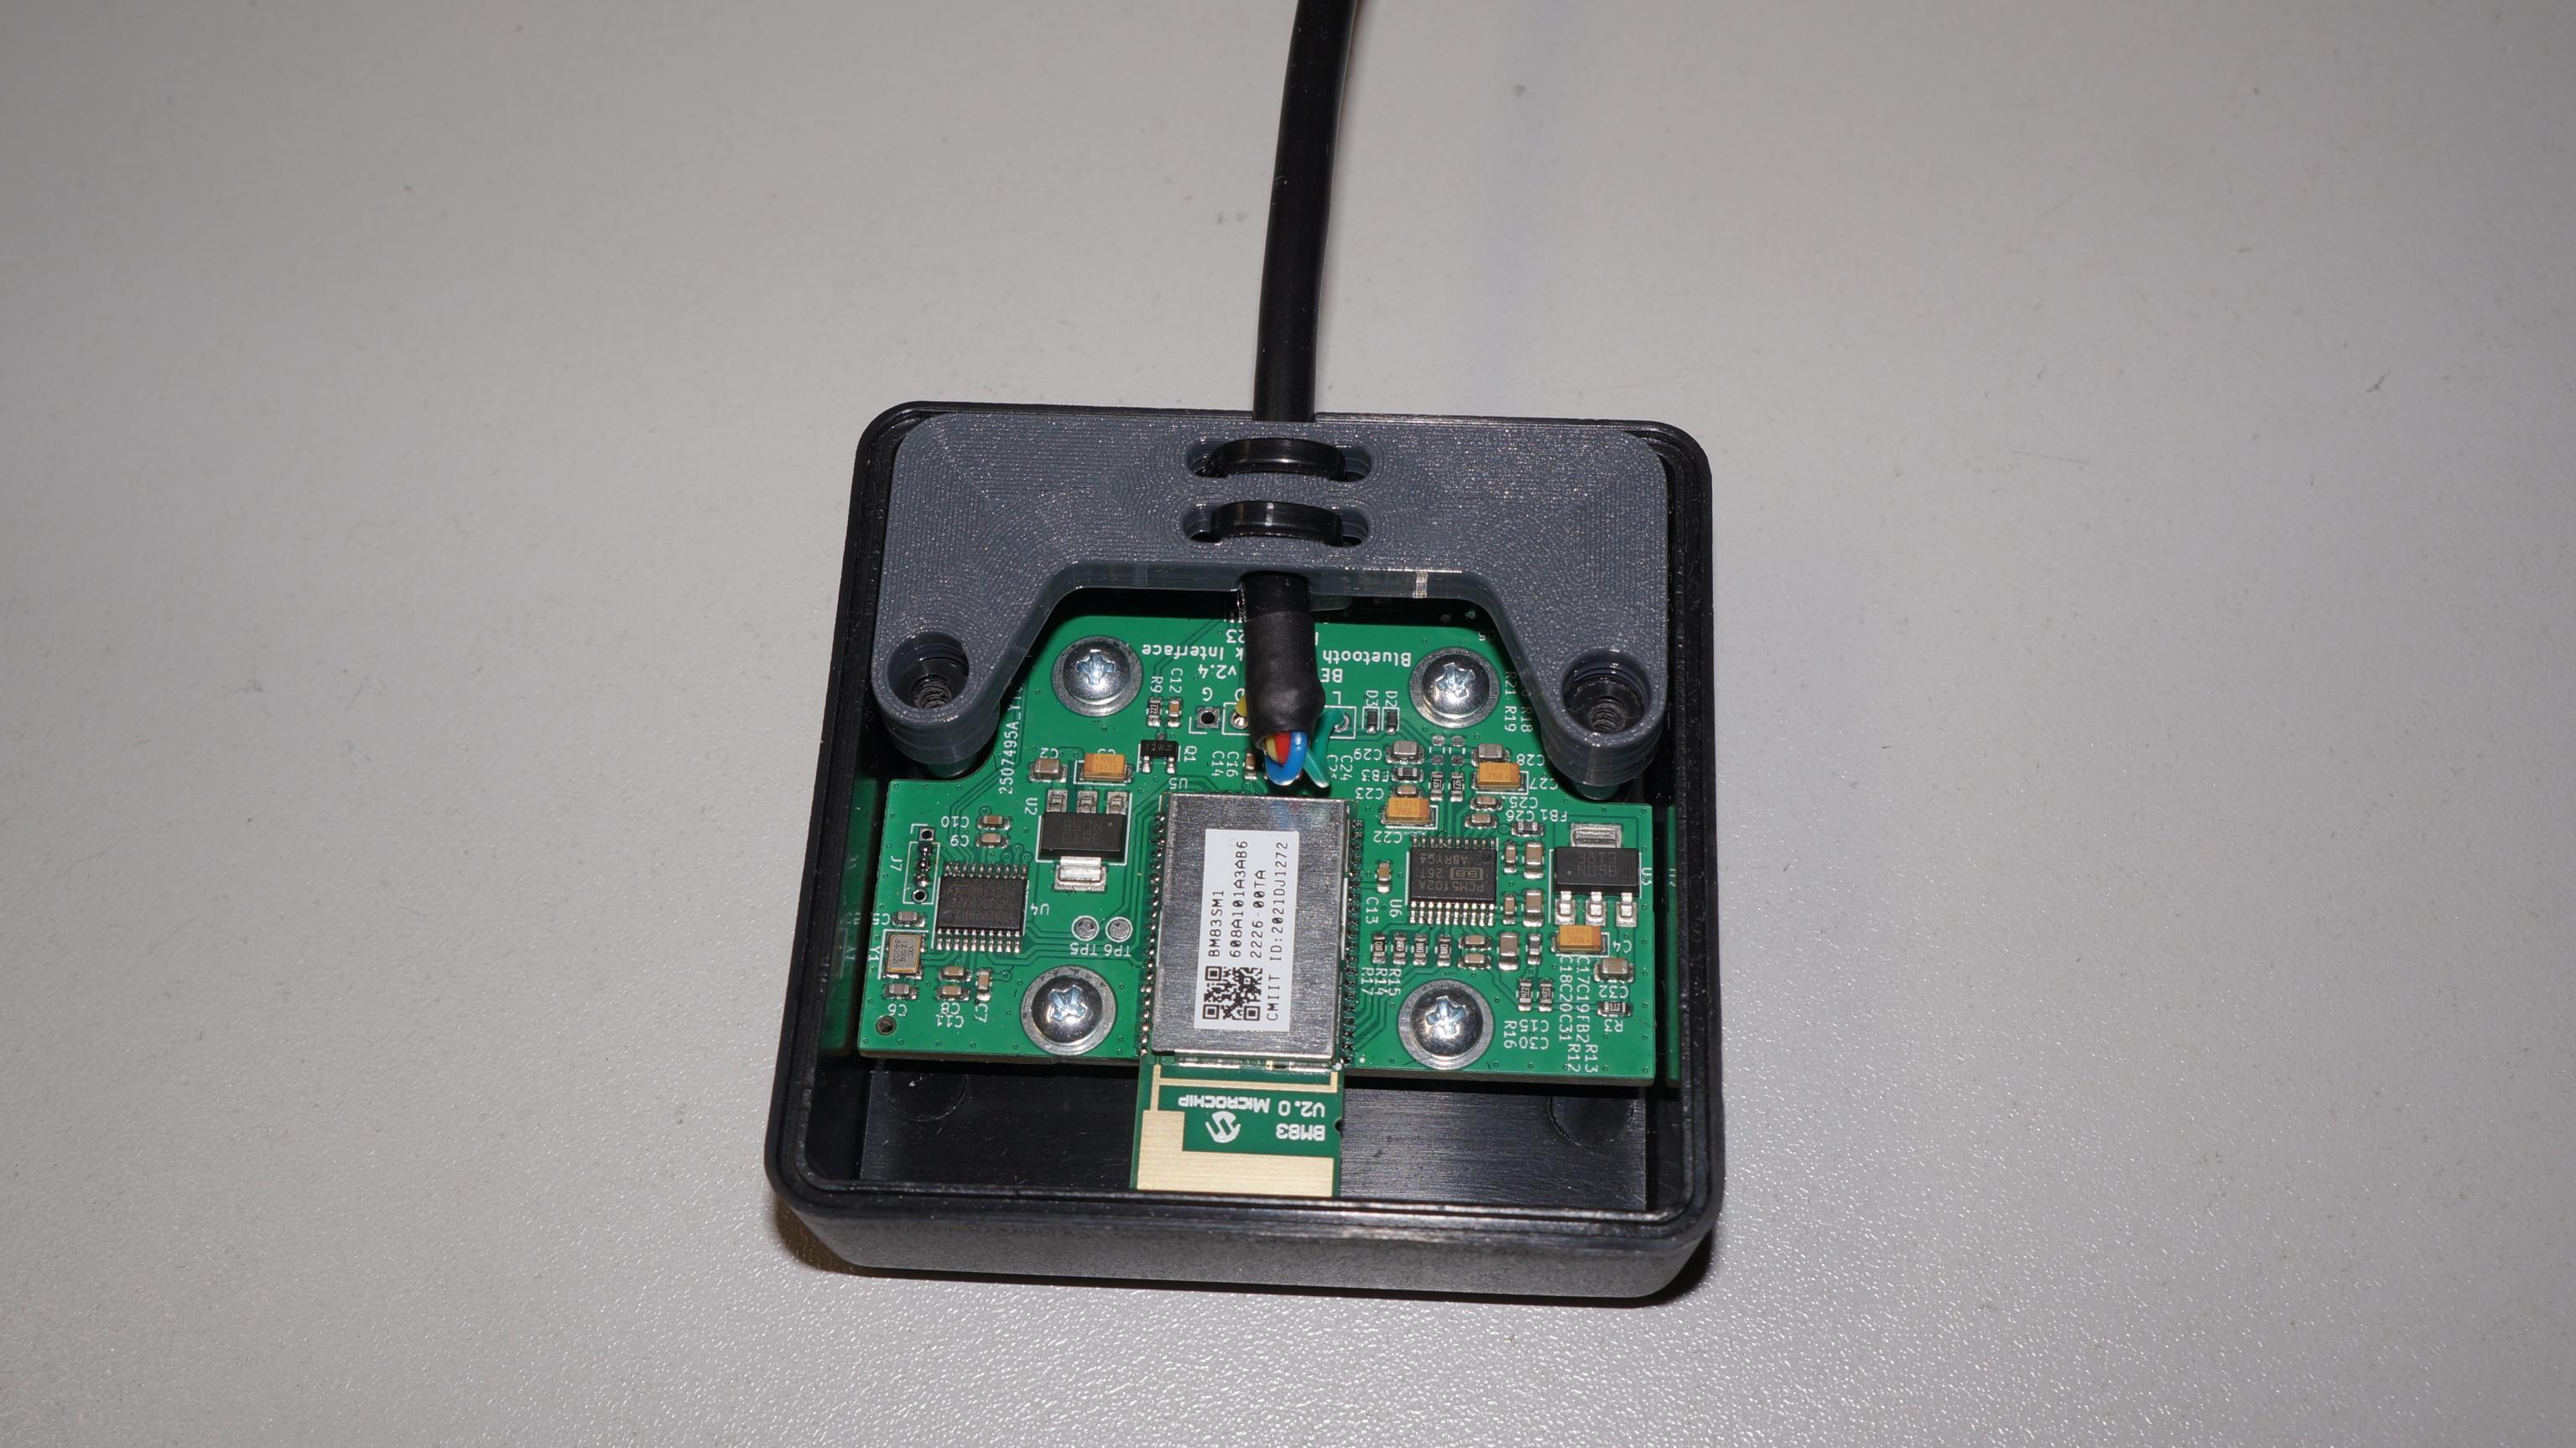 18 December 2023 at 10:25 #50242
Good evening,
Sorry for letting that many days go by without updates, I originally planned to write last week about my avancement,
but I caught the covid in the meantime, and while the novelty factor has dry out, the fever is still quite effective.Anyway, I’m now back on my feet (mostly), so here are the news :
Following B3OHACK3R’s concerns about the usage of tantalum caps, I went looking for other regulators that would be stable with ceramic caps.
I found a new Texas Instrument part, the TLV761 : it is stable with output ceramic caps, has a lower Vdrop and a better PSRR than the LM1117 I originally selected,
which both means less noise when used on a noisy USB-C supply. Bonus points, it is pin compatible with the LM1117, and comes with a soft start function ! Perfect !
I’ll be using those with cermic caps from now on.I did make some (rough) measurement of the PCM5102 DAC using my PC soundcard input to investigate the impact of changing the value of the output filter resistor.
Going from 470R to 100R produces a small (around -6dB) improvement of a bit of 50Hz present in the output. But that noise was already at a ridiculously low level (-90dB).
I reckon it lowers the output impedance of the system, making it a tiny bit better at ignoring the 50Hz ambiant noise ?
The improvement seems ever so small in my case, I don’t think I’ll implement it.I also spent a bit of time working on the firmware. I does now identify itself as a USB CDC device when plugged to a computer,
which means you can connect to it with a terminal emulator (such a Putty), and get a command prompt.
Only 3 commands are supported now : querrying the firmware version, querrying the device bluetooth name, and setting the bluetooth name.
That means if you have multiple Beotooth, each one can be named to reflect the system it connects to.
More commands might be implemented in future firmware versions.I did mill about a dozen enclosure, and the result is even better than the first I did, so now I have everything required to build the first few Beotooth.
I’ll be writing to those who sent me messages as soon as I am ready to ship theirs.Wishing you all healthy holidays !
18 December 2023 at 11:22 #50243Hi Pilatomic,
good news, really looking forward to it! Healthy holidays to you from now on.
Kind regards,
Rolf
23 December 2023 at 07:01 #50244Hello,
Right before the Christmas celebrations, as I have started shipping some Beotooth 5500, I have just put together an assembly / usage manual. You can find it there :
https://pila.fr/wordpress/wp-content/uploads/2023/12/Beotooth_Manual_V1.0.pdf
Wishing you all a merry Christmas from France !
23 December 2023 at 08:12 #50245Looks very promising ? Great job and merry christmas to you
23 December 2023 at 08:24 #50246Amazing!
MM
6 January 2024 at 06:28 #50247Hey Pila, really nice project you put together here!
I´m currently looking into creating something less sophisticated for my personal use. The idea is to control a Beomaster 6500 by transmitting Datalink commands. I´m using an off-the-shelf Arduino Uno R4 WiFi and as a code basis I used this GitHub Project.
Currently I can send and receive Datalink commands on the TV/AUX Port of the BM and I was able to retrieve commands from a MCL Sensor I bought for this Project. But unfortunately the commands only startup the BM in muted state and I can´t get it to unmute (See my post here).
I think I´m lacking a deeper understanding of the actual structure/content of the Datalink protocol beyond the published Datalink’86 spec-sheet.
As it seems you succeeded in solving these difficulties, do you have some tips and tricks or a documentation about Datalink you are willing share?Any advice is welcome!
6 January 2024 at 08:51 #50248But unfortunately the commands only startup the BM in muted state and I can´t get it to unmute
Hi!
Maybe I can jump in here. Was busy with ML lately and haven’t had a deep dive in the DL’86 protocol yet.
What I would try first is just sending it a virtual volume or mute key stroke.So similar to this
https://github.com/toresbe/datalink/blob/main/datalink86-captures-new.txt#L26But instead of the 0x09 at the end (digit-9) give it a try with 0x60 (volume up) or 0x0d (mute toggle). Maybe it will then leave the muted state it started up with.
6 January 2024 at 10:26 #50249Hi,
I’m not too familiar with the DL’86, as my projects uses DL’80.
The easiest way to achieve control of your BM6500 might be to send the control codes over IR, that way you can just duplicate what your remote is sending.
7 January 2024 at 05:38 #50250But unfortunately the commands only startup the BM in muted state and I can´t get it to unmute
But instead of the 0x09 at the end (digit-9) give it a try with 0x60 (volume up) or 0x0d (mute toggle). Maybe it will then leave the muted state it started up with.
Did a quick test run today. I wasn’t able to get it out of the initial muted state as well when started through DL’86 commands. By commands on the Audio Aux Link connector I mean.
As soon as you touch a key on the remote or on the device directly it will unmute.
Sending virtual volume keys works and you can see the volume on the device is changing. Nevertheless it stays muted. The 0x0d mute command is ignored and does nothing. Maybe there is some kind of hidden command somewhere to enable the output but I couldn’t find that yet.
So if you want to stay with the cabled version maybe just try shorting the DL80 and the DL86 pins together. Then you can send a DL80 “switch on” command (which doesn’t mute the unit by default) and then switch over to DL86 for having the convenience of a more advanced protocol. Looking like sending DL86 commands into one of the DL80 connectors does trigger nothing. So any additional unit connected there might just happily ignore it. At least worth a try.
7 January 2024 at 07:24 #50251Currently I can send and receive Datalink commands on the TV/AUX Port of the BM and I was able to retrieve commands from a MCL Sensor I bought for this Project. But unfortunately the commands only startup the BM in muted state and I can´t get it to unmute (See my post here).
Please start a new thread in order not to “hijack” Pilatomic original thread.
However it is normal behavor from the BM when it is “turned on” via MCL command. BM starts with muting speaker 1/PL and unmuting speaker 2 (MCL).
/steffen
7 January 2024 at 09:34 #50252Please start a new thread in order not to “hijack” Pilatomic original thread.
Sorry this was not my intend! I started a new thread here.
But thanks for the input anyways, much appreciated!
8 January 2024 at 07:19 #50253Received my Beotooth 5500 kit in the mail today and have assembled it.
First test om my BM 7000 was impressive. Connected with my iPhone on bluetooth with no problems.
As player I’ve tested both my iPhones own player and the spotify app with success and could control the playlist as Pilatomic have shown in his videos.
Thanks Pilatomic for a fantastic project. It gives the tape input on our beloved B&O systems a new life 🙂
/steffen
9 January 2024 at 02:52 #50254I have also received mine now and got it up and running.
Very nice and very good quality. and attention to detail for easy assembly.
I have testet it on both a Beosound Ouverture (Tape2), a Beomaster 4500 (Tape1 and Tape 2) and a MCL2AV (Tape), and from my little testing it seems to work flawless with the Beotooth 5500 activating all of the above when playing music from my phone, and also all of the systems being able to control the music (start, stop and skip) via the B&O remote and local control on the music systems.
Based on my little time with it till now I can only reccomand it.
Thanks to Pilatomic for making our old systems even more usefull 🙂
14 January 2024 at 02:11 #50255I received mine almost two weeks ago, here’s finally my two cents on the product (it’s awesome!).
Here are the contents of the kit waiting for assembly:
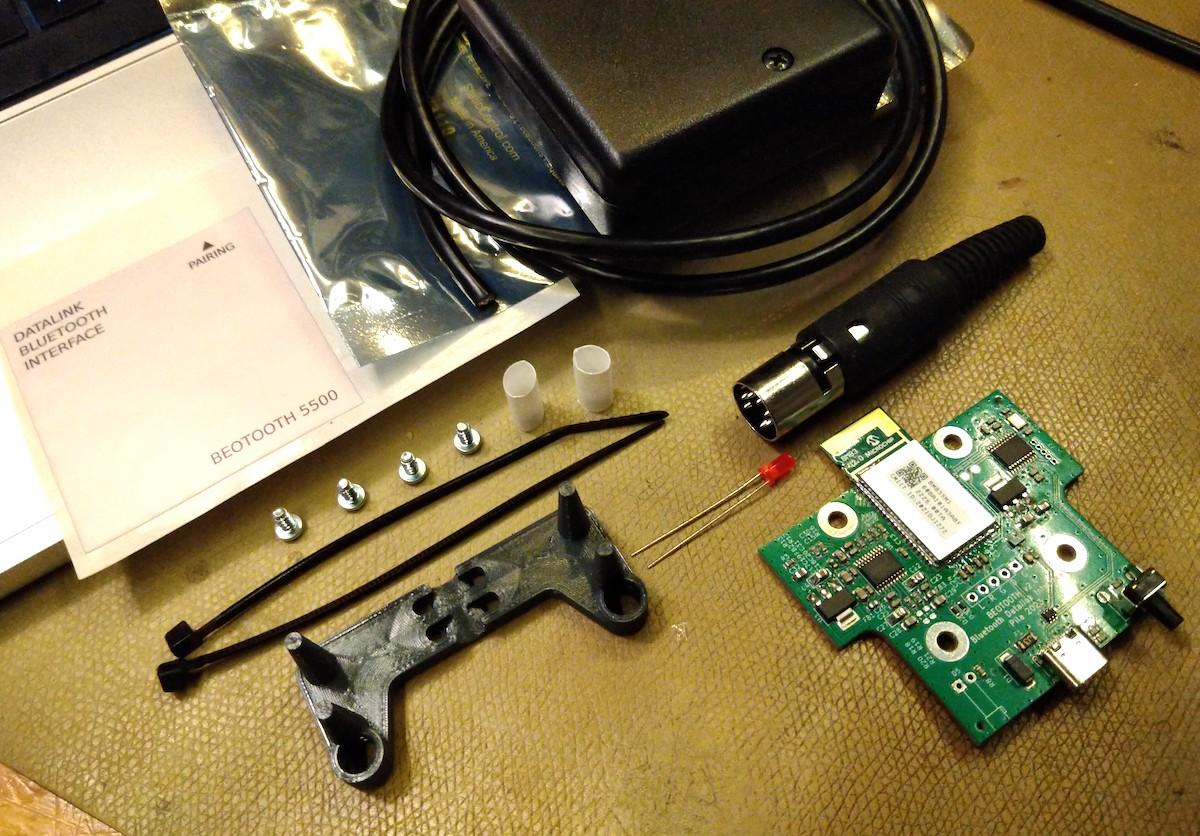
The assembly is described in detail in the supplied manual. Basically it’s just soldering the cable (connector and PCB) and the LED and fitting it all inside the case. If you have never soldered a DIN connector it can be a bit tricky at first but that’s really the hardest part. Using a small flat-top LED and a custom 3D-printed cable holder / strain relief really shows the attention to detail of the kit (fun fact: during playback the LED flashes to match the real Beocord’s track indicator).
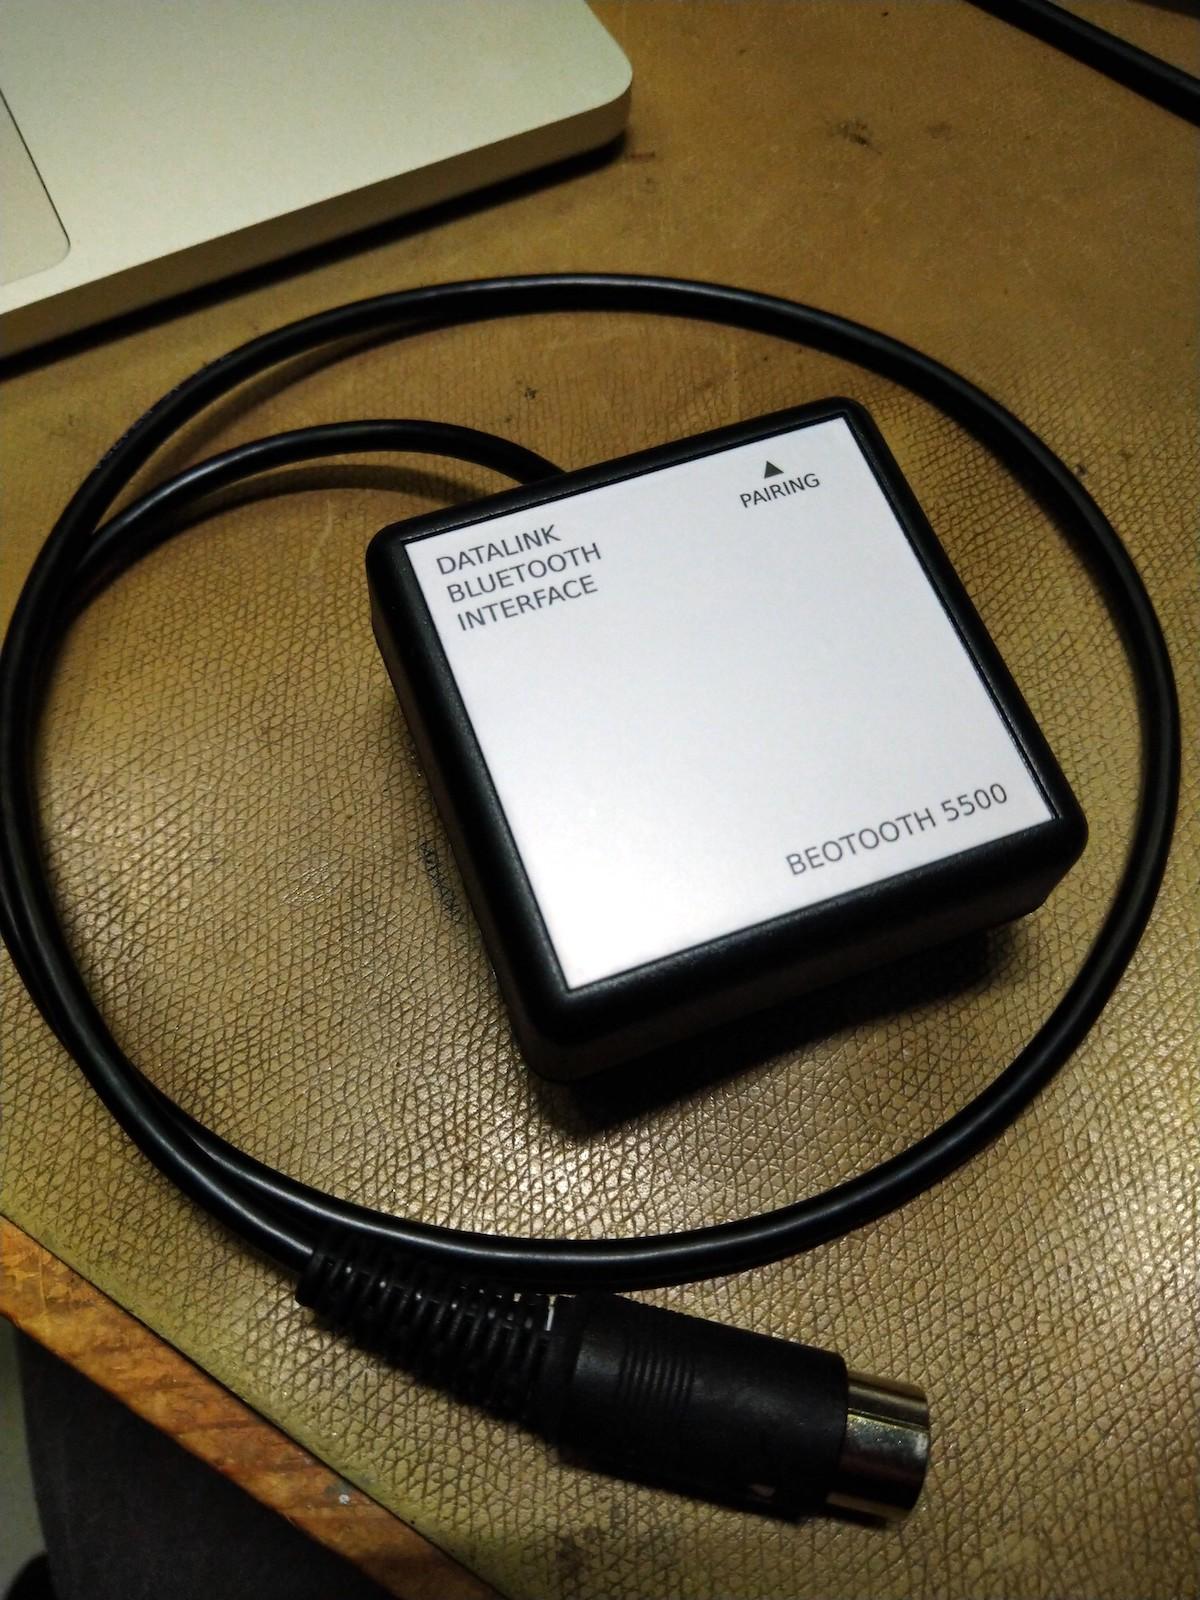
The finished product has a very B&O’ish style (perhaps reminding of the LC1 with a silver top and a black plastic case).
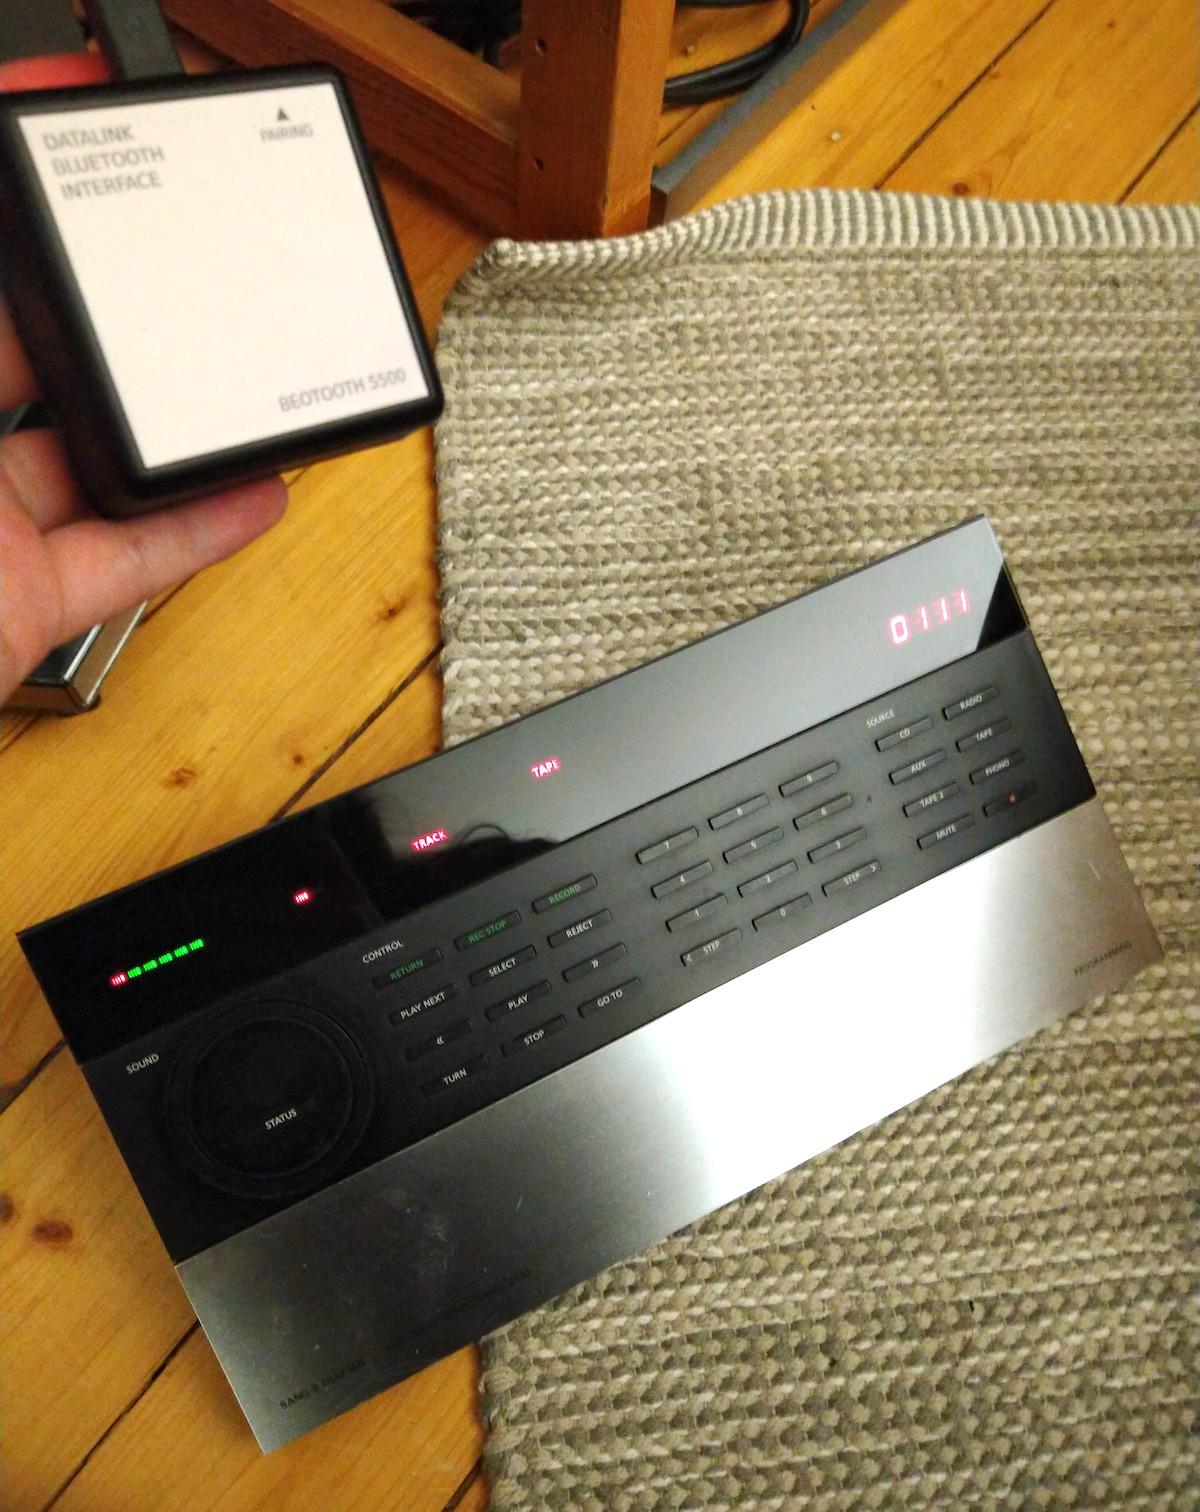
Here connected to my BM7000’s TAPE1 and showing the time display real-time on the MCP6500. I have a weak spot for the 2-way remotes and I really like how the Beotooth supports that! (This also lead me to finally building a new battery pack for my BL7000). I am also hoping to experiment using the Beotooth over MCL2 in a link room (with 2-way comms).
I had prompt replies from pilatomic and he even made two firmware updates regarding some small things I observed in my testing (difference between STOP and PAUSE commands in certain situations and a small issue with rewind/fast forward commands), so customer support was also really top notch. Also a note that not all apps that control playback over Bluetooth are not created equal (my phone’s default media app had inconsistent issues with playback controls working or not whereas my MacBook+iTunes always worked flawlessly).
This is a very useful little addition to any Datalink-equipped BM/BC. While using a Bluetooth receiver for audio on a vintage system is nothing new, the Beotooth does it well and the seemingly small addition of Datalink commands really makes it feel so much more integrated. Especially on pilatomic’s level of detail on everything.
I hope we will see more DIY-projects utilizing the Datalink bus in the future for something neat that keeps adding to the magic of B&O’s truly ageless designs.
14 January 2024 at 04:11 #50256I also received the Beotooth 5500 (fully assembled) and am looking forward to give it a try on my BeoMaster 6500!
Regards, Johan
15 February 2024 at 05:35 #50257Hello,
Quick update for those who already own a Beotooth 5500.
Firmware V1.3 is now available, with the following changes :- Fix playback not resumed when switching from Beogram to Beotooth (I was not processing that datalink command)
- Prevent transmitting AVRCP (Playback control) commands to Bluetooth player when player is not sending audio. This fixes an issue where I was listening music on my computer though the Beotooth, then switched to a headset. A few minutes later, The Beomaster would, rightfully, go to sleep, but that caused a “pause” AVRCP command to be emitted, pausing the playback. “Play” commands are still sent unconditionally, to be able to resume playback.
If you are interested to get that firmware update, contact me via private message.
In other news, I am still in contact with Microchip, diagnosing why the AVRCP Browsing feature is not working. Once that is solved, I should be able to support selecting a track by its track number directly.
30 April 2024 at 05:09 #32476deleted
- AuthorPosts
- You must be logged in to reply to this topic.


